Do you want to learn how to remove the front cover of the window air conditioner? If you are not familiar with the job, this might sound tricky at first.
Window air conditioning systems typically feature two different covers responsible for protecting the unit’s internal components. The task of the front cover is to keep the front portion of the air conditioning unit well protected. This front cover is that part you can see from inside your room.
On the other hand, the outer cover protects the internal mechanisms of the air conditioner from the different outdoor elements. It is quite simple and easy to remove the front cover of your air conditioning system. All you need to do is remove a few screws on the front. However, the process still depends on the specific model and brand of your air conditioner unit.
Read on below to learn how to do it properly.
Steps to follow to remove the front cover of window air conditioning unit
To be honest, it is a bit difficult to verbally explain the process of removing the front cover of your window air conditioner. The first thing you need to do is get the instruction manual for your unit. More than anything else, this is where you will find detailed instructions on how to remove your window AC’s front cover.
When you already have the manual on hand as well as the tools you will need for the job, it is now time for you to get started. Refer to the manual to determine the location of the front screws. There are often two screws connecting the front cover to the air conditioner unit. If you find it hard to locate the screws, you can research online by searching for the name of your AC unit’s model.
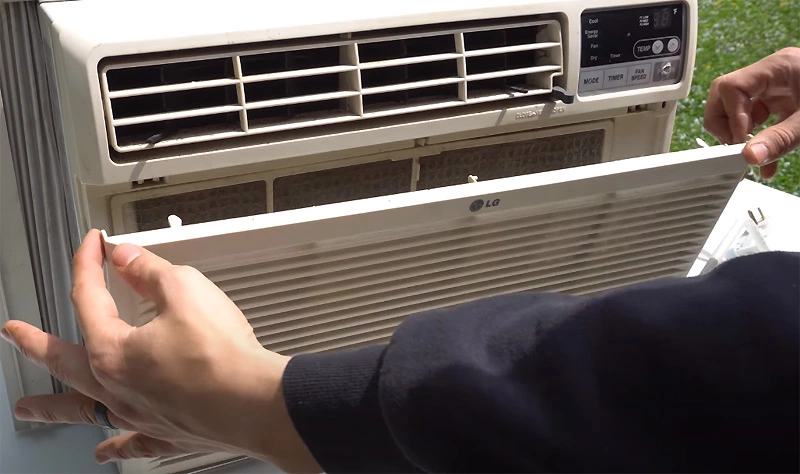
Here are the steps you need to follow to successfully remove the front cover of your window AC unit:
- Before anything else, turn off your AC and unplug this from the power outlet. Don’t forget that it is extremely dangerous to do any maintenance work on window air conditioner while it is plugged in.
- Use your fingers to remove your AC’s control knob and check for those screws found near it.
- Proceed to removing the screws. Use a Phillips screwdriver to undo the front screws of the window air conditioning unit.
- Be sure that you don’t take any metal objects or sharp tools out from the back of your window AC.
- Lift the front cover and take this away from the unit. Unhook the upper portion of the cover to remove it completely.
Tools to clean your window AC
If your window AC is only slightly dusty, this can be cleaned using those everyday things that might be lying around your home. If the back part of your unit requires cleaning, things can get a bit tricky and this is when you will need some specialized products for cleaning.
A foaming cleanser is the best product you can use for cleaning the blades and coils of this particular AC style. A nylon brush can also be used for light-duty work on the fins. Remember that many household brushes are not meant for this work.
Another tool that you will use is a fin comb when doing maintenance work. Fins outside the house can get damaged and you can straighten these out using a fin comb set. You can choose to purchase just one tool although you can also buy a set of brushes for every pin per inch covering more systems.
Why do you need to clean your window AC?
Prior to doing any type of chore, you need to remember why you are making such an effort in the first place.
Just like other major home appliances, your air conditioner can degrade after some time. The filter can get clogged up, the unit can get dirty, and its efficiency can drop in general as the result. However, you don’t need to worry since it is completely natural.
The only thing your window AC needs is some care and love for it to shine and sparkle like new all over again.
It is not only aesthetically pleasing and satisfying to have a clean and tidy air conditioner because it will also offer the following benefits::
- You and your family will enjoy cleaner air to free it of irritants that can cause asthma, allergies, as well as other respiratory problems.
- The air around your home will also smell fresher. Getting rid of that faint odor of air conditioner dust and mold can leave the indoor air feeling cleaner and fresher.
- Your unit will run quieter. If the machine is dirty, it will have to work much harder just to give off a similar result. Through lowering its workload, the air conditioner can become more efficient, which means that your AC will also run in silence.
- You will be using less energy and if the air conditioner is more efficient, it will also lead to reduced energy bills.
- Your air conditioner will last much longer. If the machine deals with lesser stress, you will benefit from healthier air conditioning system with a longer lifespan.
Best practices for your window air conditioner
It is not just enough that your window AC is squeaky clean because you also need to make sure that it stays its best for a long time. Here are some quick tips that will help you enjoy using your unit to the fullest:
- Make sure that the filter is always clean. Cleaning it every month will be fine but you need to do more as needed during those seasons when your unit is in constant use. If you plan to get a new one, be sure to look for HEPA-certified filters that are better for allergy sufferers or those who love clean air.
- Straighten the fins. After and during deep cleans, the cooling fins must be kept straight as much as possible. These are used for cooling the air must run straight up and down.
- Use the unit more often to prevent mold buildup. It is also best to shut away the AC if you will not use it.
- Keep the unit in the shade as it will suffer if you leave it out under the sun.
- When in doubt, get the help of a professional.
You may also want to learn how to recharge a window air conditioner and how to clean a window air conditioner evaporator coils