In any high-efficiency cooling system, an HVAC float switch (also known as a condensate overflow switch) is the primary safety device designed to prevent catastrophic water damage. As your air conditioner removes humidity from the air, it produces gallons of water that must be drained away. If the drain line becomes clogged with algae or debris, the water backs up into the unit. Without a float switch, this water would overflow into your ceiling or flooring; with one, the switch detects the rising water level and breaks the low-voltage circuit to your condenser, shutting the system down before a spill occurs.
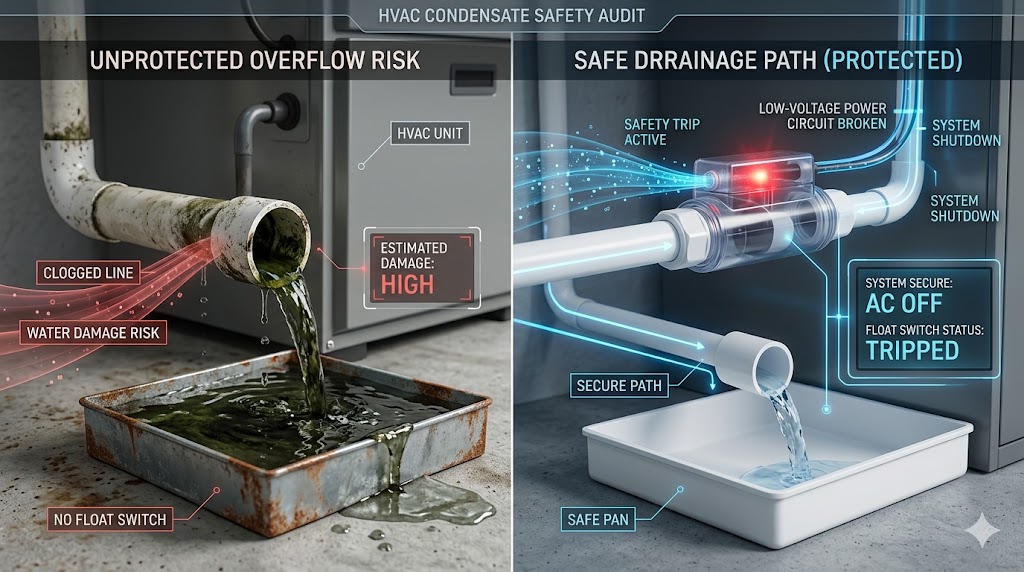
Modern building codes almost universally require these switches, yet many older systems are either missing them or have them installed incorrectly. A properly functioning switch doesn’t just “turn off the air”; it serves as an early warning system that your drainage infrastructure is failing. Understanding whether your switch is located in the primary drain line or the emergency pan—and knowing how to reset it once the blockage is cleared—is a vital part of commercial and residential property maintenance.
To see if your system’s drainage safety is up to code, use the Condensate Safety & Drainage Auditor below.
What is a float switch in an air conditioner

Water keeps on coming out of the drain pipe from the HVAC system during the whole of its operating time. Due to the build-up of debris inside the drain pipes, they can get clogged sometimes which, as a result, stops water from getting out of the unit.
On average, an HVAC system drains out about 20 gallons of water in 24 hours, and these numbers can give you a clear indication of the damage which can be caused if water is not able to drain out properly.
The HVAC float switch is probably the only tool to prevent the HVAC system from overflowing the water in case of drainpipe blocking or any other issue.
The switch has a simple mechanism to trip and shut down the HVAC system whenever the water reaches an alarming specific level. This thing allows the owners to call a technician and get the leakage fixed without experiencing a ruined house due to water overflow.
Where is the HVAC float switch located
The exact location of the float switch changes depending upon the design of your HVAC system. Some HVAC systems come in both horizontal and vertical shapes without a secondary drip pan, the HVAC float switch is mainly equipped on the drainpipe of the system.
Some of the horizontal HVAC systems come with a secondary drip pan usually attached to the lower part of the unit. This drip pan is installed to protect the system from the damages that may be caused due to condensation. In such HVACs, the float switch is directly installed on their secondary drip pan.
Do all AC units have a float switch
Most of the new air conditioners in the market have a pre-installed float switch as it is a great thing to not only facilitate the buyers but enhance the build quality and performance of AC as well.
Where most companies don’t ignore this important component, some are still not installing it in their system and the responsibility to have one installed is forwarded to the customer.
You should always choose the HVAC that has a float switch but if you go for another brand, you should equip a float switch to your system as it is worth the investment.
How much is a float switch for AC
The float switch is not that expensive as you can easily find one of the best quality under the price range of $50. It will only take 25 to 30 minutes for a professional technician to install the switch in the air conditioner and get the job done efficiently. The installation cost may vary depending on the area that you live in.
How to wire float switch HVAC?
- Start by removing the screws from the switch so that it can be fitted on the drain pan.
- Install the switch by putting the raised edge of the pan in the middle of two parts.
- Put all the screws back and make sure that it has been tightened perfectly on the drain pan.
- Now look for a thermostat wire as the float switch wire connection will be created with it.
- Open the panel box and track down the other end of the thermostat wire that is inserted into a transformer that feeds power to it.
- Connect one wire with the power wire, usually in the red color.
- The second wire should be hooked right where the power wire was plugged in.
- This is it, just close the panel and start your HVAC back again.
💡 Pro Diagnostic Tip: Most float switches are wired into the ‘R’ (Power) wire. If this switch trips, your thermostat will completely lose power and go blank. If you are using a smart thermostat and find it is frequently rebooting or losing connection, check out our Ecobee Compatibility & Wiring Guide to see if your 24V power supply is being interrupted by a safety switch.
How to reset the float switch HVAC
- There is no science in it as all you need is to clear all the water from the drain pan first.
- Make sure you flush water out of the drain pan without spilling it on the electric wires of the panel.
- Lose the flat switch screws and move the switch so that the water can come out thoroughly.
- There are possibilities that your float switch may be glued, if this is the case, use a vacuum or any other suction device to remove water from the float switch.
- Wait for a few minutes and start your HVAC system as you normally do.
- It may take a couple of minutes to start at the first run but will work efficiently and quickly after that.
💡 Pro Diagnostic Tip: When a float switch trips, it abruptly cuts power to the outdoor condenser. Some smart thermostats or furnace boards will interpret this as a system failure. If your system has shut down and you’ve cleared the water, check for any blinking lights and cross-reference them with our HVAC Error Code Index to ensure no other safety lockouts occurred.
How to bypass the HVAC float switch
- Start by removing the float switch from the HVAC unit.
- Open the outside cover of the float switch cover and reach the electric part.
- Open or untie the screws to loosen the wire connection inside the float switch.
- Take out the wires and connect them back with the new or repaired one HVAC float switches by connecting the wire in the same manner.
- Use waterproof glue if necessary to keep things in place.
- Let the glue dry out completely and put it back on the system as you did for the old one during installation.
How to test the HVAC float switch
- The most accurate way of testing your HVAC float switch is by using a Multimeter.
- Connect the float switch wires to the leads of the multimeter.
- Set the measuring unit to Ohms.
- Hang the float switch in the down position and look for the value.
- Do the same while lifting the switch up in the air.
- If the value on the multimeter is “0” in the first case while it becomes “1” in the second, the float switch is perfectly fine.
More resources: