Is your Carrier air conditioner suddenly blowing warm air and flashing a cryptic code like E1, P1, or EC on the display? In the middle of a hot day, a malfunctioning AC is an emergency, but that flashing light is actually your system’s built-in self-diagnosis tool pointing you exactly to the failure.
Whether you are dealing with a communication error between the indoor and outdoor units (E1), an unstable voltage protection trigger (P1), or a sudden refrigerant leak (EC), decoding these Carrier faults quickly can save you from unnecessary and expensive service calls. We have compiled the complete troubleshooting database covering 59 specific codes for Carrier split systems and inverters.
Instead of scrolling through dense technical manuals, use our Interactive Carrier Error Code Decoder below. Simply select your code to instantly reveal the hidden cause and the step-by-step DIY solution to get your airflow back to normal.
Select your flashing error code below for instant diagnostics.
⚠️ Pro Safety Tip: While issues like cleaning blocked filters (to prevent overload) or waiting for an automatic defrost cycle (H1) are safe DIY fixes, errors involving the IPM power module (H5), inverter compressor drives (P4), or refrigerant leaks (EC) should always be handled by our licensed HVAC technicians.
Carrier air conditioner error code DN
Communication error between main board and EXV.
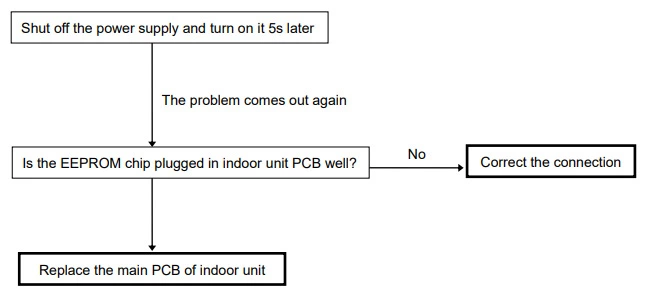
Carrier air conditioner error code E0
Indoor unit EEPROM parameter error.
Timer lamp status: off
Operation lamp blinking: 1 time
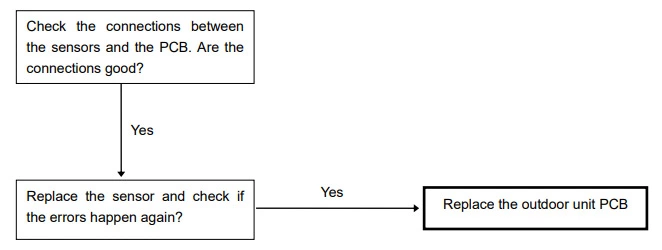
Carrier AC error code E0 troubleshooting procedure:
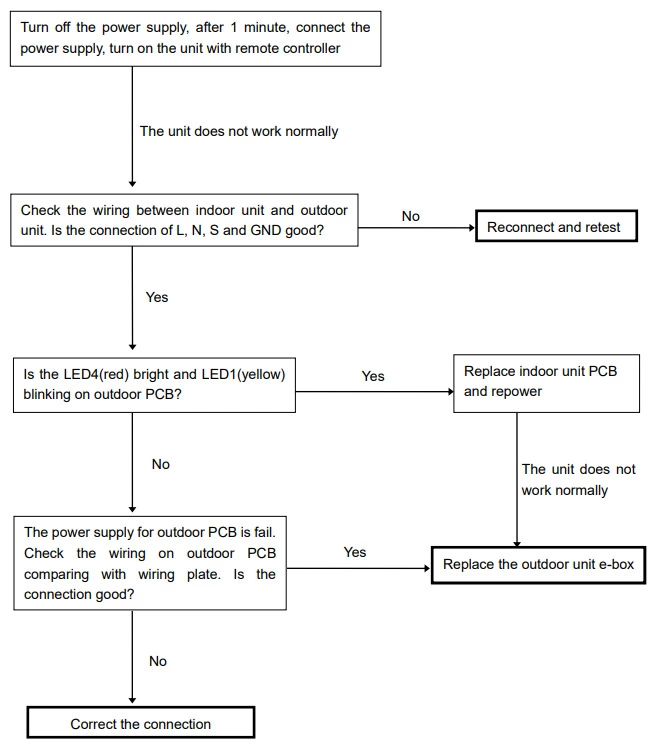
Carrier air conditioner error code E1
Indoor / outdoor units communication error.
Timer lamp status: off
Operation lamp blinking: 2 times
Carrier AC error code E1 troubleshooting procedure:
Carrier air conditioner error code E2
Zero-crossing signal error.
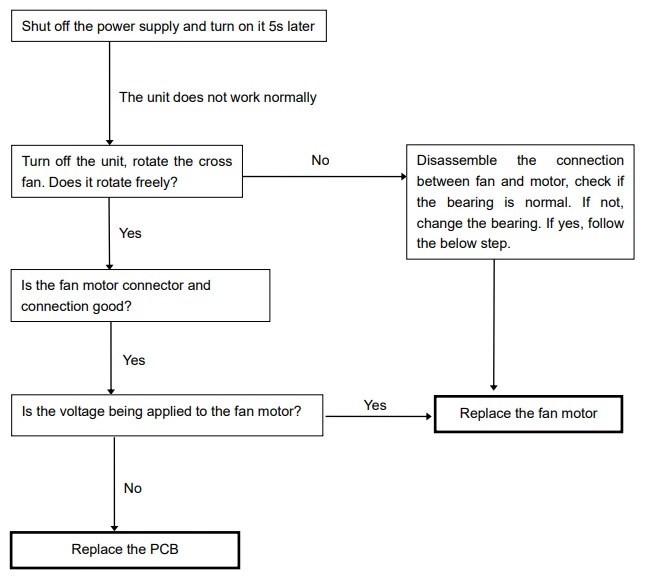
Carrier air conditioner error code E3
Indoor fan speed has been out of control.
Timer lamp status: off
Operation lamp blinking: 4 times
Carrier AC error code E3 troubleshooting procedure:
Carrier air conditioner error code E4
Indoor room temperature sensor T1 open circuit or short circuit.
Timer lamp status: off
Operation lamp blinking: 5 times
Carrier AC error code E4 troubleshooting procedure:
Carrier air conditioner error code E5
Evaporator coil temperature sensor T2 open circuit or short circuit.
Timer lamp status: off
Operation lamp blinking: 6 times
Carrier AC error code E5 troubleshooting procedure:
Carrier air conditioner error code E6
Open or short circuit of room or evaporator coil temperature sensor.
Carrier air conditioner error code E7
Outdoor fan speed has been out of control.
Carrier AC error code E7 troubleshooting procedure:
Carrier air conditioner error code E8
System overload protection.
Carrier air conditioner error code E9
Cold blow protection.
Carrier air conditioner error code EC
Refrigerant leakage detection.
Timer lamp status: off
Operation lamp blinking: 7 times
Carrier air conditioner error code EE
Memory card error.
Carrier air conditioner error code EN
Frequency limitation for module circuit protection.
Carrier air conditioner error code EU
Frequency limitation for module temperature protection.
Carrier air conditioner error code F0
Pump down mode.
Carrier air conditioner error code F1
Outdoor ambient temperature sensor T4 open circuit or short circuit.
Timer lamp status: light
Operation lamp blinking: 2 times
Carrier air conditioner error code F2
Condenser coil temperature sensor T3 open circuit or short circuit.
Timer lamp status: light
Operation lamp blinking: 3 times
Carrier air conditioner error code F3
Compressor discharge temperature sensor T5 open circuit or short circuit.
Timer lamp status: light
Operation lamp blinking: 4 times
Carrier AC error code F3 troubleshooting procedure:
Carrier air conditioner error code F4
Outdoor unit EEPROM parameter error.
Timer lamp status: light
Operation lamp blinking: 5 times
Carrier air conditioner error code F5
Outdoor fan speed has been out of control.
Timer lamp status: light
Operation lamp blinking: 6 times
Carrier air conditioner error code F6
Frequency limitation for overload protection.
Carrier air conditioner error code F7
Cooling oil return cycle.
Carrier air conditioner error code F8
Frequency limitation for system circuit protection.
Carrier air conditioner error code F9
Frequency limitation for module circuit protection.
Carrier air conditioner error code FH
Frequency limitation for freeze protection.
Carrier air conditioner error code H1
Defrost or heating oil return cycle.
Carrier air conditioner error code H3
Compressor overheat protection.
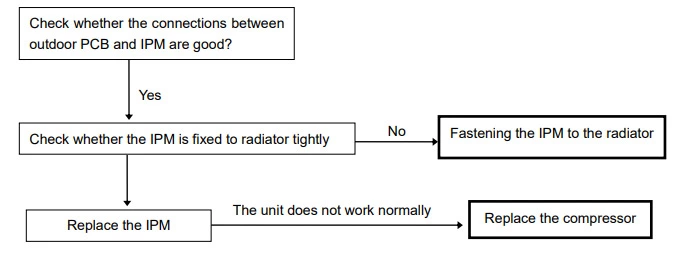
Carrier air conditioner error code H5
IPM Protection.
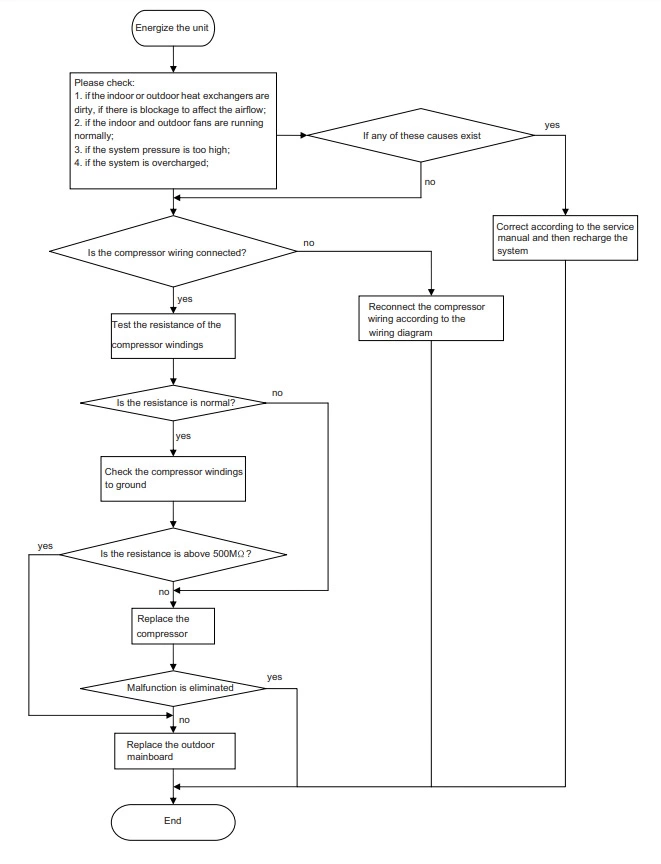
Main checking point:
- Is the input voltage of the unit within the acceptable range?
- Is the compressor connected correctly?
- Is the compressor winding resistance correct?
- Are the heat exchangers clean / unblocked?
- Is the refrigerant charge correct?
Carrier AC error code H5 troubleshooting procedure:
Carrier air conditioner error code H7
Compressor speed reduction.
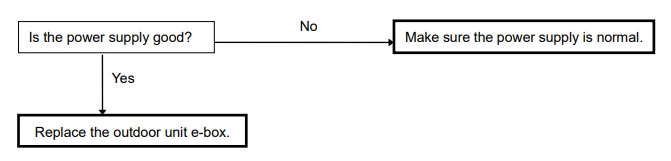
Carrier air conditioner error code HC
PFC protection malfunction.
Main checking points:
- Is the power supply correct?
- Is the reactor broken or miss-wired?
Carrier AC error code HC troubleshooting procedure:

Carrier air conditioner error code HE
Compressor demagnetizing protection.
Carrier air conditioner error code L9
Compressor high voltage protection.
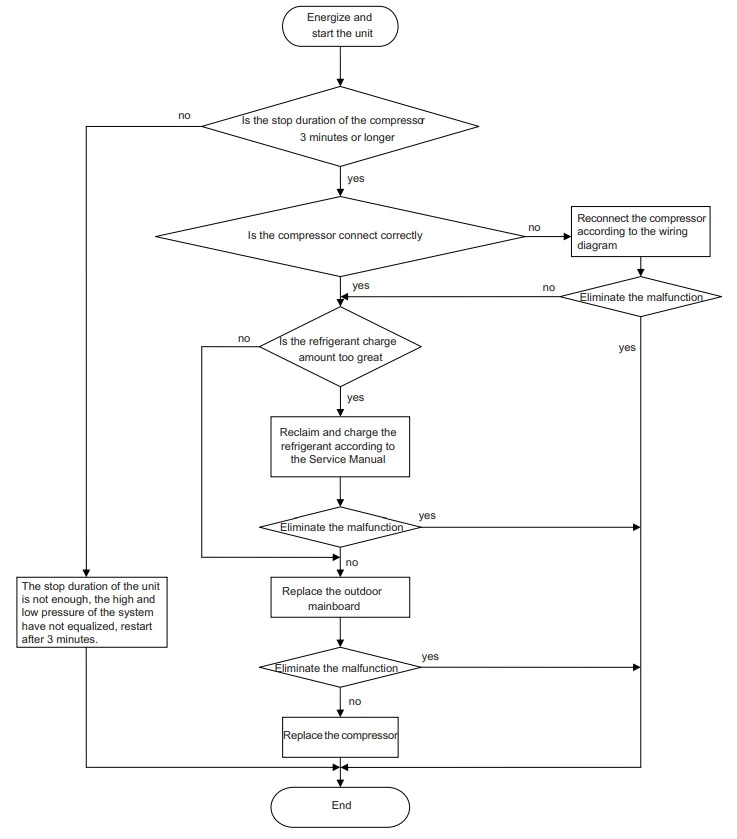
Carrier air conditioner error code LC
Compressor start-up failure.
Main checking points:
- Is the stop duration of the compressor is correct?
- Is the compressor connected properly?
- Is the compressor broken?
- Is the refrigerant charge amount too great?
Carrier AC error code LC troubleshooting procedure:
Carrier air conditioner error code LD
Compressor phase loss protection.
Carrier air conditioner error code LE
Compressor stalling.
Carrier air conditioner error code LF
Compressor over-speed protection.
Carrier air conditioner error code LP
Indoor and outdoor units mismatch.
Carrier air conditioner error code P0
IBM malfunction or IGBT over-strong current protection.
Timer lamp status: flash
Operation lamp blinking: 1 time
Carrier AC error code P0 troubleshooting procedure:
Carrier air conditioner error code P1
Over voltage or too low voltage protection.
Timer lamp status: flash
Operation lamp blinking: 2 times
Carrier AC error code P1 troubleshooting procedure:
Carrier air conditioner error code P2
High temperature protection of compressor top diagnosis and solution.
Timer lamp status: flash
Operation lamp blinking: 3 times
Carrier AC error code P2 troubleshooting procedure:

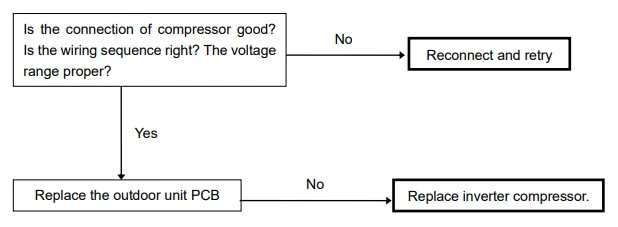
Carrier air conditioner error code P4
Inverter compressor drive error.
Timer lamp status: flash
Operation lamp blinking: 5 times
Carrier AC error code P4 troubleshooting procedure:
Carrier air conditioner error code P5
Compressor current protection.
Carrier air conditioner error code P6
Communication error between the inverter drive and main board.
Carrier air conditioner error code P7
Heat sink temperature sensor malfunction.
Carrier air conditioner error code P8
IPM over temperature protection.
Carrier air conditioner error code P9
Open contactor.
Carrier air conditioner error code PA
Input current protection.
Carrier air conditioner error code PC
Current sensor malfunction.
Carrier air conditioner error code PD
Current sensor miss-wiring protection.
Carrier air conditioner error code PF
Inverter board ambient temperature sensor malfunction.
Carrier air conditioner error code PH
High voltage protection.
Carrier air conditioner error code PL
Low voltage protection.
Carrier air conditioner error code PP
Abnormal input AC voltage.
Carrier air conditioner error code PU
Capacitor charging malfunction.
Carrier air conditioner error code A5
Condenser coil inlet temp sensor malfunction.
Carrier air conditioner error code A7
Condenser outlet temperature sensor malfunction.
Carrier air conditioner error code U1
Compressor phase detection malfunction.
Carrier air conditioner error code U3
Low DC bus voltage.
How to remove Carrier air conditioner outdoor unit?
Total Time: 35 minutes
-
Remove top cover and wiring cover
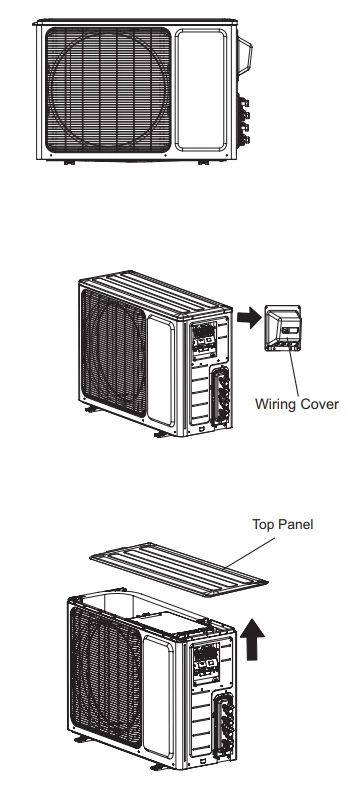
Before disassembly, remove screws retaining the wiring cover, lift the cover upward to remove it. Remove screws retaining the top cover, lift the top cover upward to remove it.
-
Remove front grille and front panel

Remove the screws retaining the front grille to the front panel. Remove the front grille. Then remove the screws retaining the panel, lift it upward to loosen the clasp on the right side, rotate it to the left and then remove the front panel.
-
Remove right and left side panels
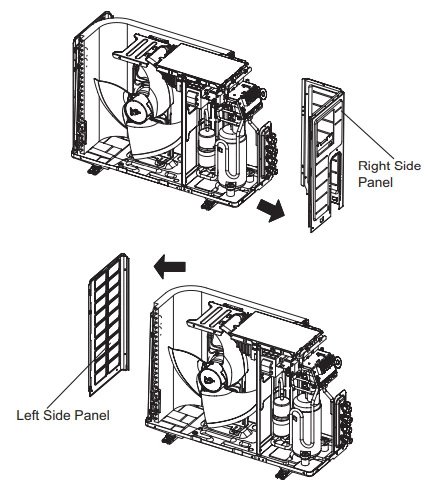
Remove the screws retaining the right side panel to the chassis, the valve support and the electric box, then remove the right side panel. Then remove the screws retaining the left side panel to the chassis, then remove the left side panel.
-
Remove the fan blade
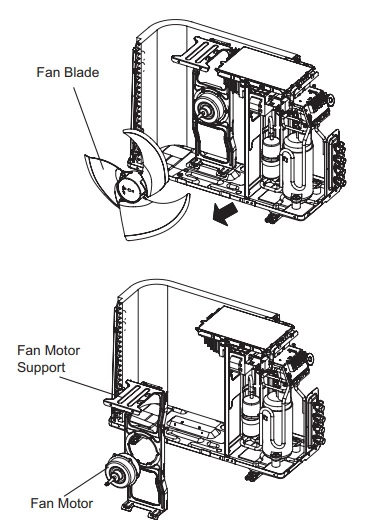
Remove the nut retaining the blade to the motor shaft, then remove the fan blade.
Remove the four (4) screws retaining the motor; disconnect the motor wiring, then remove the motor.
Remove the two (2) screws retaining the motor support; then lift the motor support upwards to remove it
-
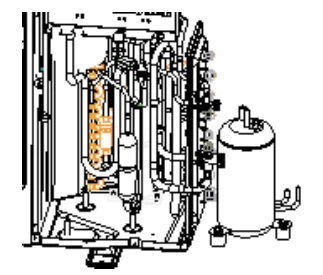
Remove control box assembly
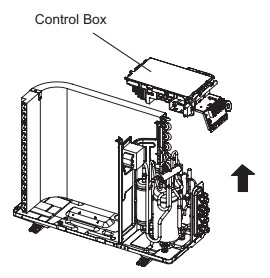
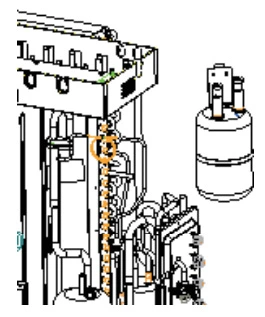
Remove the screws retaining the control box sub-assembly; loosen the wire bundle; remove the wiring terminals and then lift the control box upwards to remove it.
-
Remove sound shield
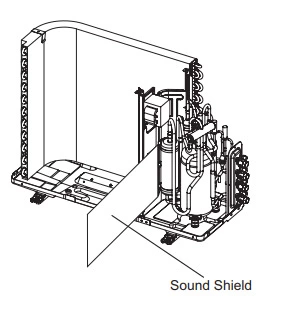
Carefully remove the sound shield from around the compressor.
-
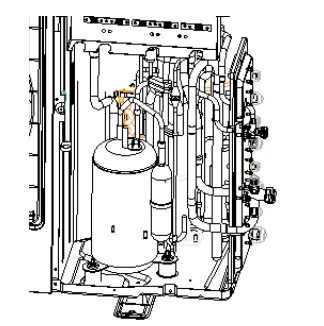
Remove reactor
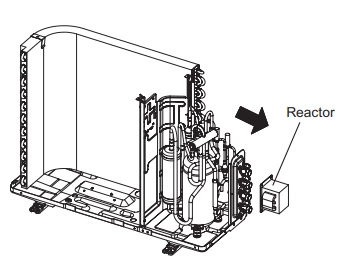
Remove screws holding the reactor to the compressor partition; then remove the reactor.
-
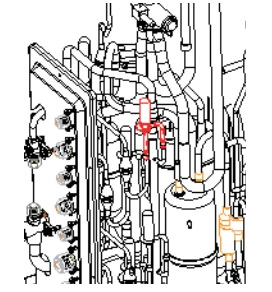
Remove 4-way valve
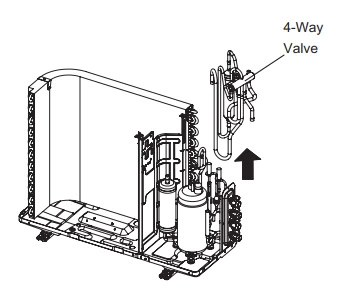
Reclaim system refrigerant charge.
Cut all lines connected to 4-way valve; disconnect solenoid coil wiring and remove 4-way valve from unit.
-
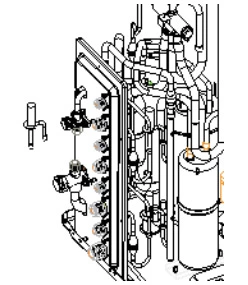
Remove electronic expansion valves and shut-off valves
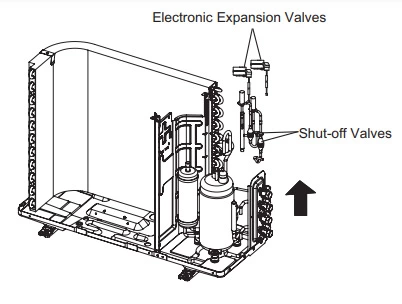
Remove the solenoid coils from the electronic expansion vlaves. Cut all lines connecting the valves to the system and remove the valves.
-
Remove the service valve support assembly
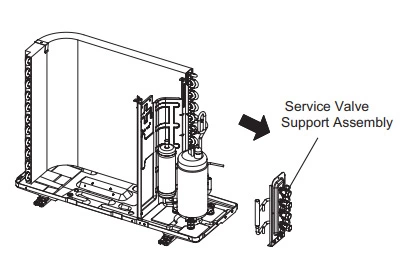
Remove the screws retaining the valve support to the chassis; then remove the valve support assembly.
-
Remove compressor partition
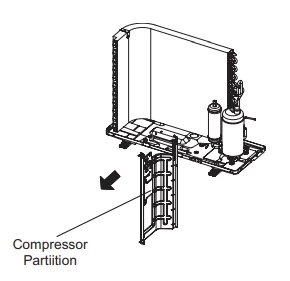
Remove screws retaining the partition and then remove the partition.
-
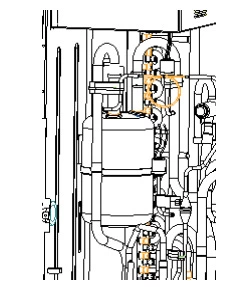
Remove compressor
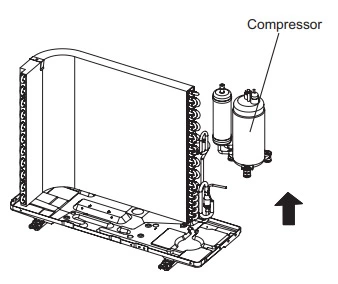
Remove three (3) nuts from compressor mounting bolts, then lift compressor from base pan.
-
Remove condenser
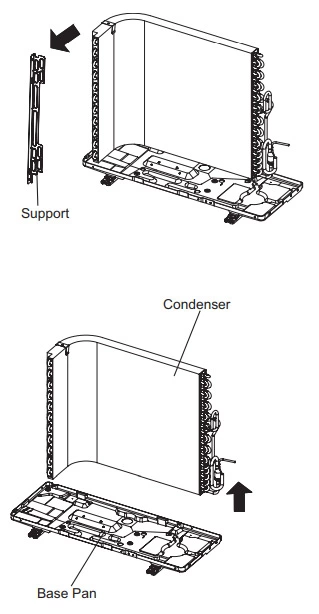
Remove the screws retaining the support and condenser assembly. Then remove the support.
Remove the condenser from the base pan.
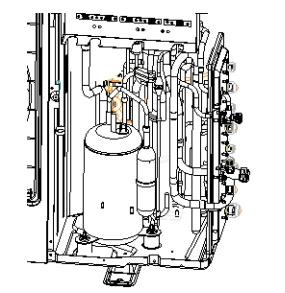
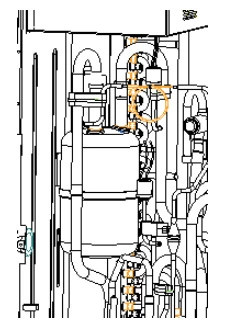
How to disassembly and assembly Carrier air conditioner compressor?
Make sure that there is no refrigerant in pipe system and the power supply is cut off before disassembling the compressor.
1. Disconnect the power cord
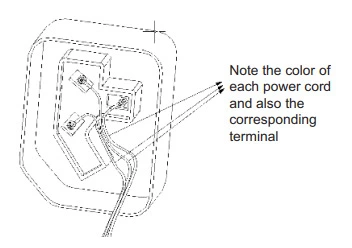
- Remove the fixed screws on the power cord by using a screwdriver.
- Draw out the power cord.
Note: Please note the color of each power cord and also the corresponding terminal number when removing the power cord in case of misconnection.
2. Disassemble the pipeline connected with compressor
Disconnect the pipeline connected with compressor.
3. Remove the bad compressor
- Remove the bolts retaining the compressor.
- Remove the bad compressor from the bottom plate.
4. Place the new compressor on the bottom plate and connect the suction inlet and discharge outlet with the pipe system
- Place the compressor on the bottom plate.
- Tighten the nuts.
How to disassembly and assembly Carrier air conditioner 4-way valve?
1. Remove the 4-way valve coil
- Remove the screws on the fixed coil by using a screwdriver.
- Remove the 4-way valve coil.
2. Remove 4-way valve
Reclaim all refrigerant charge in system. Cut all line connections to 4-way valve and remove from unit.
3. Replace the 4-way valve
- Place the new 4-way valve in the right place.
- Reweld the new 4-way valve with the pipeline
4. Install the 4-way valve coil
- Replace the 4-way valve coil in place
- Tighten the screws with a screwdriver.
How to disassembly and assembly Carrier air conditioner electronic expansion valve?
1. Remove the electronic expansion valve coil
Remove the electronic expansion valve coil by rotating it until the lock is unfixed.
2. Remove the electronic expansion valve
Cut all lines to the electronic expansion valves then remove.
3. Replace the electronic expansion valve
Place the new electronic expansion valve in the right place.
4. Reconnect the electronic expansion valve with the pipeline
Reconnect the electronic expansion valve with the pipeline by welding.
5. Install the electronic expansion valve coil
Set the electronic expansion valve coil on the valve body and adjust the lock to the right place.
How to disassembly and assembly Carrier air conditioner vapor liquid separator?
1. Disconnect the liquid separator and the connected pipeline
Disconnect the liquid separator and the connected pipeline.
2. Remove the liquid separator
- Remove the bolt retaining the liquid separator
- Remove the liquid separator from the middle baffle.
3. Fix the new liquid separator and connect it with the pipeline
- Place the new liquid separator on the middle baffle.
- Tighten the bolt and reconnect the new liquid separator with the pipeline by welding.